
Top-down trees for site plans – and a free generator that draws them
Trees do a lot of work on a plan: they give scale, soften hard edges and show where there is shade and space. This article walks through the common ways of drawing a tree from above, shows the same trees from the side – and introduces a free tool that generates both as vector graphics, each tree different.
Open the tree generatorFree, without sign-up, in your browser. SVG, PDF and PNG.

Why the trees decide how a plan reads
A building footprint alone says little about size. Put a tree with a ten-metre crown next to it and the eye has a measure: trees are the scale figures of the site plan. Rows of them trace streets and avenues, groups mark squares and courtyards, a single large crown gives a place its centre.
They also set the tone. A competition plan with soft watercolour crowns tells a different story from a planning application with thin circles – from the same footprints. Which is why it is worth choosing the tree style on purpose rather than taking whatever symbol the CAD library happens to offer.
The trouble starts with the numbers. A neighbourhood plan easily holds a few hundred trees. Copy one symbol that often and the plan looks stamped; draw each one by hand and an afternoon is gone.
Ten ways to draw a tree from above
These are the styles the tree generator starts from. All of them are procedural: the crown outline, the leaves, the branches and the pen strokes are worked out anew for every tree, so a sheet of fifty contains fifty different trees that still belong together.
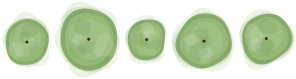
Watercolour
Soft washes that pool at the edge and run out beyond it. For competition plans and presentation drawings.
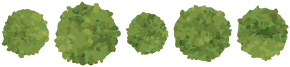
Foliage
Leaves dabbed on in light and dark. Dense and summery – at home on landscape plans.
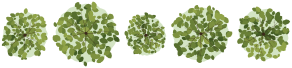
Leaves & branches
A light crown with the branches lying over it: structure and foliage at once.
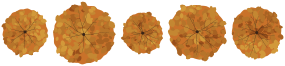
Autumn
Thinned-out leaves in warm colours, the branches showing through. For atmospheric illustrations.
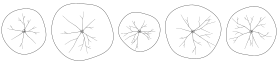
Line drawing
One organic line with the branches inside. The classic for black-and-white plans, and it leaves the ground readable.
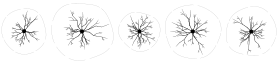
Winter tree
Bare, forking branches and only a hint of the crown. Shows what lies under the tree.
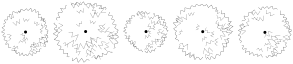
Sketch
A scribbled edge with shading on one side, like a quick pencil drawing. For concept sketches.
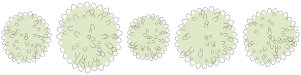
Loops
An edge of loops over a pale fill. Friendly and illustrative.
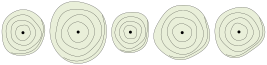
Rings
Rings within the crown and a double line on the shadow side. Graphic, with a sense of volume.
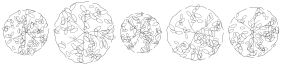
Ink leaves
Leaves drawn in pen inside a broken edge – the look of an engraving.
The same trees in side view
A section or a street elevation needs the tree from the side. The generator draws every tree in elevation as well, in the style you set for the plan: the same fill and texture, the same pen strokes along the outline, a shadow slanting down to the ground – and branches fanning upwards from the trunk. A tree is as wide from the side as from above and both views share one axis, so they can stand one above the other.
What a view from above cannot tell is set separately: the form of the crown – round, egg-shaped, columnar, conical or umbrella – and its height, and the trunk with its height, taper, root flare, bend and one to three stems.

Crown size and line weight
A plan tree is drawn with the diameter of its crown. Small ornamental trees come to four to six metres, street trees mostly to six to ten, and mature park trees to twelve, fifteen or more. A mix of sizes looks more natural than one diameter throughout – in the generator you set the smallest and the largest crown, and each tree falls somewhere between.
The sheet is drawn at 1:200, so a 10 m crown measures 50 mm, and line widths are millimetres on that sheet. In a drawing at 1:200 the trees have the right size at 100 %; for 1:100 scale them to 200 %, for 1:500 to 40 %. Lines of 0.15 to 0.25 mm keep the trees lighter than the buildings, which is usually what you want.
Vector, so you can keep working on them
Everything the generator draws is a vector path: the crown, every leaf, every watercolour wash, every branch and every stroke. In SVG and PDF the trees stay sharp at any size, and each path can be selected, recoloured and reshaped afterwards. Changing all crowns from summer green to a muted grey for a black-and-white plan is one “select same fill colour” away.
In the SVG every tree is a group with a name of its own, so you can pull single trees out of the sheet and place them. If a program needs pixels, there is a PNG with a transparent background at 150, 300 or 600 dpi.
Using the trees in your program
- Illustrator, Affinity Designer, Inkscape, Figma
- Open the SVG. Each tree is a named group: drag it into your plan, or turn it into a symbol.
- InDesign
- Place the PDF or the SVG; both stay vector in print.
- AutoCAD, Rhino, Vectorworks, ArchiCAD
- Import the PDF as vector geometry (in AutoCAD with PDFIMPORT; Rhino also opens SVG) and save the trees as blocks.
- QGIS
- Export one file per tree and use the SVGs as marker symbols for a point layer of trees.
- Photoshop, SketchUp, presentations
- Use the PNGs with their transparent background.
How to generate your trees
- 1Open the tree generator, choose the view – from above, from the side, or both – and set how many trees you need and how large their crowns are.
- 2Pick one of the styles above as a starting point.
- 3Shape it under “Edit” if you like: fill, texture, outline and shadow for both views, branches and trunk for each view on its own, and the crown form for the side view.
- 4Export the sheet – or one file per tree – as SVG, PDF or PNG.
Frequently asked questions
Is the tree generator free?
Yes. Generating and downloading trees is free, and there is no account to create.
Are the trees vector graphics?
Yes. SVG and PDF contain vector paths only (the one exception is the optional noise texture, which is a pixel pattern). PNG is the raster export.
Does the generator also draw trees in side view?
Yes. Set the view to “Side View” or “Both”: every tree is drawn in elevation in the same style, with a crown form, branches and a trunk you set for it. With “Both”, the side view stands over the top view on one axis.
How do I get the trees to the scale of my drawing?
The sheet is drawn at 1:200. Place the trees at 100 % in a 1:200 drawing, at 200 % for 1:100 or at 40 % for 1:500.
Can I change the colours afterwards?
In the generator at any time, and in any vector program after the export: fills and lines are ordinary paths.
Why does every tree look different?
Each tree is drawn by a procedure with its own random seed. “New variations” deals a new set; the same settings and set number give the same trees again.
Trees where they really stand
The generator is the tree module of Plantaube, taken out on its own. In Plantaube the same trees stand at their real positions: the site plan maker loads the trees of any place from OpenStreetMap, with their crown sizes where they are mapped, and draws them in these styles – together with buildings, streets, green spaces, water and shadows, to scale as PDF, SVG, PNG or DXF.